Sunday, 30 August 2009

Bittersweet Life


This morning we recieved the sad news that my Father in Law finally lost his long battle with cancer, and died peacefully in his sleep. While we are glad that he doesn't have the pain anymore, we were hoping that the Little Late One would arrive before we had to say goodbye to his Grampa. It's not the case though and we're going to miss him terribly.


We were lucky enough to have lots of time with him and he was able to come all the way to Romania last year to spend 3 months with us before we got married. We know he was overjoyed to have been at the wedding and moreso when he heard about the baby.


Today was his birthday, He turned 75. Happy Birthday Dad, we're thinking of you.

Saturday, 29 August 2009

No Action....

We're still on the wait.... that's right, no baby yet, really was hoping for some action tonight, so that baby can at least be born on my father in law's birthday... so fingers crossed eh?

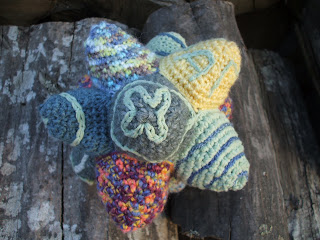
In the meantime, I am still knitting (and crocheting) so I am about halfway through my sisters dropstitch and I also made this.....


It's my baby nephew Sam's scraptacular crocheted 'Celestine' by berocco, there is also a knitted version if you are interested. I didn't use the recommended yarn (in case you couldn't tell) I used multicoloured scraps, which I also decorated afterwards to make a lovely interesting stuffed toy for my little nephew in Australia.

I have to say, it was a challenge with the slight differences in gauge created by the different yarns, but I thnk it turned out fine in the end.

Will keep you all posted if you promise to keep your fingers crossed.

Thursday, 27 August 2009

Coral Cast on

Well.... day 2 overdue. I'm finished the shawl, thankfully and I think it looks lovely, this yarn really is superb for knitting pretty shawls... I'm even contemplating investing in some more to knit gifts for some other friends.


In the meantime, since baby hasn't shown up in the night, I thought I would cast on another Dropstitch project. This time dropstitch scarf just like the pattern calls for (though a teensy bit wider) for my sister. She really suits pink and this is another ball of rayon boucle, but not the silk stuff. It's laceweight, so again, not the sportweight that the pattern calls for, but it will look lovely in the end I hope. Here's the progress so far...


That second pic looks like pink spaghetti, or a pink birds nest, but it will be fine once washed and blocked I think (hope).

So that's all from us for the moment.... I'll just knit myself into labour, or insanity... we'll see which offer comes up first.

Wednesday, 26 August 2009

Dropstitch and D-day


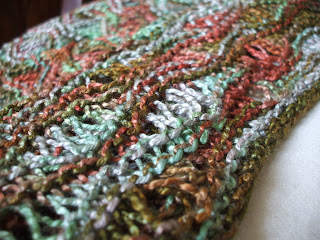
Well... The dropstitch shawl is almost done, it's absolutely gorgeous in this rayon boucle... there is a shiney lustre to the yarn which allows the colours to stand off against each other.... of course, this also makes it difficult to capture well in photos, but I have attempted none the less.


As for my other little project, well, apparently yesterday just wasn't his due date, so, we're still waiting. Hopefully the bumpy ride up to my folks house will help....

I have my knitting project for the hospital stay (at least 4 days) all sorted and packed, with my nighties and tiny tiny little baby clothes.

So Bump.... ready when you are!!!

Tuesday, 25 August 2009

Still on the inside...

Still on baby watch, as you can see, he's not emerged yet.


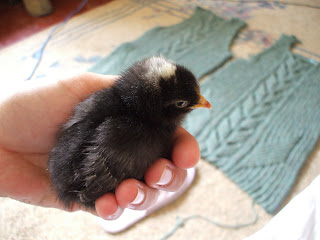
Still... the chicks have grown nicely havn't they. Still knitting away on the shawl, it's odd deliberately dropping stitches.... more difficult than you imagine.

Rosalind Wrist Warmers : : wooly wrist warmer pattern


My sister in law lives on a farm in Australia and in the winter it gets pretty cold there, so I designed these wooly wrist warmers for her, a combination of pretty and practical.


Materials
100g of New Lanark Donegal Silk Tweed (in 'Cobalt')

Set of 4mm (US size 6) DPNS or 4mm (US size 6) circular needle or whichever style of needle you like to use to knit in a round.

Cable needle of appropriate size

Gauge

5 stitches = 1 inch in 2x2 rib

Abbreviations

CO Cast on

K Knit

P Purl

St Stitches

Rnd round

C4B Slip next 2 stitches onto cable needle and hold at the back of work, K2, then K2 stitches from the cable needle

C4F Slip next 2 stitches onto cable needle and hold at the front of work, K2, then K2 stitches from the cable needle


Cable Panel (Worked over 24 stitches)

Rnd 1: P1, K6, C4B, P2, C4F, K6, P1
Rnd 2 (And all even Rnds): P1, K10, P2, K10, P1
Rnd 3: P1, K4, C4B, K2, P2, K2, C4F, K4, P1
Rnd 5: P1, K2, [C4B] twice, P2, [C4F] twice, K2, P1
Rnd 7: P1, [C4B] twice, K2, P2, K2[C4F] twice, P1
Rnd 9: P1, K2, [C4B] twice, P2, [C4F] twice, K2, P1
Rnd 11: P1, [C4B] twice, K2, P2, K2[C4F] twice, P1
Rnd 13: P1, K2, C4B, K4, P2, K4, C4F, K2, P1
Rnd 15: P1, C4B, K6, P2, K6, C4F, P1
Rnd 16 : As Rnd 2

Begin!

CO 46 stitches

If you are using DPNS then divide the stitches up into 24, 12, 1o, this will make it easier for you to work the cable design, as it will be laid across one needle, these 24 stitches will be the top/back of the wrist warmers.

If you are working on circular needles, divide the stitches into 24 and 22, the 24 stitches will be the top/back of the wrist warmers and the 22 will be the palm side of the wrist warmers

Rnd 1 start knitting on the palm stitches as follows:

[ P2, K2 ] 5 times, P2

now accross the 24 stitches, set up the cable design. P1, K4, P2, K4, P2, K4, P2, K4, P1

Continue in this pattern for 5 Rnds

Rnd 6 : [ P2, K2 ] 5 times, P2,

P1, [ work Rnd 1 of Cable Panel as above ] , P1

Rnd 7 : [ P2, K2 ] 5 times, P2,

P1, [ Work Rnd 2 of Cable Panel as above ], P1

Continue working in this way and following the cable pattern until you have completed 2 repeats of the cable panel, where you will be ready to work the slot for the thumb.

The pattern for the wrist warmers is exactly the same for both hands except the thumb slot, which is worked on opposite sides of the wrist warmers... see below and remember to knit one for each hand!

Right Hand
[ P2, K2 ] 3 times, P2, K1. now take a piece of waste yarn, preferably in a different colour so it is easy to see and knit the next 7 stitches with it. Now slip those stitches back onto the left hand needle so that you can go back over them, re-knitting them in the original pattern, which would be K1, P2, K2, P2

Left Hand
Take the waste yarn (as above) and knit the first 7 stitches , now slip those back onto the left hand needle ready to knit them in the pattern, which will be [ P2, K2 ] 5 times, P2,


Now that you have completed the appropriate thumb slot, continue knitting rounds in the pattern, completing one more repeat of the cable panel and cast off. You've finished the main body of the wrist warmers, all that remains to be done is to go back and knit the thumbs.

Thumbs
Go back to the thumb slot and remove waste yarn carefully, so as not to lose the live stitches that are left there. Arrange the live stitches either on 2 needles, if using DPNS or on top and botton of a cicular, the idea being that you have 6 live stitches above and 7 live stitches below.

Now attach your yarn and knit the 7 stitches on the lower needle, pick up 2 stitches between the upper and lower needle, knit the 6 stitches on the upper needle and pcik up two between the upper and lower needle. You should now have 17 stitches. Knit 4 rnds, or to desired length and Cast off losely.


This pattern was very kindly(and efficiently) test-knit by Marit, and so there shouldn't be problems with the pattern, but feel free to contact me if you have any difficulty.

Monday, 24 August 2009

Half-way through a shawl

I am officially the cast-on queen.... here's the most recent project, I'm already half way through it.


It's an altered version of the Drop Stitch Scarf by Christine Vogel. The idea was to make a shawl to use for breast feeding, I'm using the lovely brick oven rayon yarn that I bought a little while back from yarntopia treasures. The pattern is altered only in that I used a fingering yarn instead of sport or DK, and I cast on 136 stitches instead of 26.


The yarn really works well with this pattern, I love how it's working out.


Speaking of baby, he's due NOW..... no sign yet though, who knows, maybe I'll get the shawl finished before he shows up.


All this time at home with my feet up does my knitting the world of good!

Friday, 21 August 2009

Christmas Presents

I think annual maternity leave would help me a great deal in getting christmas makes finished in time. I finished my sister in law's wrist warmers and I am writing up the pattern for a friend to proof for me, and today, I finished Eliza's ballerina, I started her on Monday and stitched the last bits together today.


She's a variation on Alan Dart's Tooth Trader, but modified to be a ballerina instead of a fairy,


I think she turned out reasonably well.... I mean, knitted toys are not my forte, but, well, it's ok.

Monday, 17 August 2009

Make way for baby


Well, we are on our final week now, the baby's due date is next monday or tuesday and judging from how quickly last week whipped by, I fancy we'll be holding the baby before we know it, so this weekend we made sure we had the baby space all wrapped up and ready....

I organised the baby sheets...


And flannel swaddling...


The baby bouncer, play mat, and snugli carrier...


and the nappy's are all stacked neatly in the nappy holder which my husbands grandmother made for my sister in law when she had her wee ones.... whom I happily inherited from ....

Sorry about the sideways pic of the nappy stack!

We are using 'real' nappy's as we feel that even though disposables may be easier at times, that they are a real waste of money (especially here, there arn't burdget brands) and they are not really ideal for people who try to keep waste to a minimum.... we're not tree-huggin' hippies, but we live on the land we feel that you need to think about these things.

I think we are as ready as we'll ever be, how ready can you be lets face it?!

Surface crochet : : A crochet tutorial


As I was writing up my pattern for the spiral baby blanket, I was going to link to a tutorial on surface crochet, but I couldnt seem to find one which would be comprehensive enough, so I just thought I might as well make a quick one up.

Surface crochet is a great way to embellish both crocheted items and knitted items, it's quick and easy and you can make up the patterns as you go along. If you know how to crochet already, then this will be a walk in the park for you to learn.

Firstly you'll need a practice swatch and a contrasting colour to practice with.... and of course, a crochet hook. Here's my practice piece.... it doesn't have to be very big....


Hold your contrasting yarn behind your work so that your crochet hook can access it, I hold mine like this, but you can hold it any way you feel comfortable....


Now, pass the hook through the front of your work where you want the design to begin like this.....


Let the hook grab the yarn and pull it back through the hole, it should look like this...


Now, pass the hook through the front of your work in the next stitch space like this....


And do the same, hook the yarn through the work and you should have this.....


Now, just like ordinary crochet, you pull the new loop through the old one and you have a stitch on the surface.....


After a few stitches it should look like this...


Repeat this till the end of your work and it should look like this....


And there you have it.... you can surface crochet to your heart's content now....

Sunday, 16 August 2009

Baby Blue : : A spiral baby blanket


Well, I promised to post the pattern when I got round to writing it, so here it is, free and available to anyone who dares.


This crochet pattern is really easy, so if you are a beginner at crochet, it's well worth having a go at it.

Materials

3 x 100g balls of DK or Sport weight wool in colour of your choice
1 x 50g ball of DK or Sport weight wool in contrasting colour for edging

1 x 4mm (G) crochet hook

Gauge

Another reason that this is a beginner friendly pattern is that really the gauge doesn't matter, in fact, if you want to use heavier wool and a larger hook it will work out just as well, as long as you have a fabric that you are happy with, you can also make this as large as you like, my version was made pram size, like a small mat, but more wool and you can make a huge one if you like, you just keep going.

Abbreviations
Ch chain stitch
Ss slip stitch
Dc double crochet

Rnd round

*******Very important edit*****
The pattern was written in British english, so the DC (double crochet) in American English is actually a SC(single crochet)**

Begin!...
Ch 4 and join with Ss to make a ring.

Rnd 1: Ch 7 , 1 Dc into ring, [Ch 6, 1 Dc into ring] 5 times, joint to th first Ch of th round with Ss

Rnd 2: 1 Ss into each of next 3 Ch [ Ch 4, 1 Dc into next 6 Ch loop] 6 times

Rnd 3 : [Ch 4, 2 Dc in next 4 Ch space, 1 Dc into next Dc] 6 times

Rnd 4: [Ch 4, 2 Dc into next 4 Ch space, 1 Dc into each of next 2 Dc, skip 1 Dc] 6 times

Rnd 5: [Ch 4, 2 Dc into next 4 Ch space, 1 Dc into each of next 3 Dc, skip 1 Dc] 6 times

Rnd 6: [Ch 4, 2 Dc into next 4 Ch space, 1 Dc into each of next 4 Dc, skip 1 Dc] 6 times

Rnd 7: [Ch 4, 2 Dc into next 4 Ch space, 1 Dc into each of next 5 Dc, skip 1 Dc] 6 times

Continue working rounds as you have been doing increasing by 1 Dc each time as you can see above, until you reach the desired size for your blanket.

When you reach the desired size for your blanket, change to the contrast colour and work one round of even Dc stitches (one in each stitch, no increasing, no chain stitches etc)

**at this point, if you don't know how to surface crochet, take a look at this tutorial before you continue on the blanket**

With the contrast colour go back to the center of your blanket and surface crochet round the center circle (as you can see in the first picture). Then surface crochet along the inside of one of the spirals, following the line of holes...


Repeat for each spiral as you can see and it should look like this....


There you have it, a simple pattern that doesn't take much time or much concentration.... or even much skill in crochet.

Have fun giving it a go, if you have any problems or corrections feel free to contact me.

Saturday, 15 August 2009

Triumph...at last

Well, here it is finally..... Urban lanark, finished and sewn up (not blocked yet though)...


Sadly, the bump means I couldn't do what I enjoy most when I finish something.... so it's being modled by a cushion and my bench.

Tuesday, 11 August 2009

Working hard

Well... look at the spoils of my week... I have managed to get back and front finished on Urban lanark....


And as you can see I have turned 2-at-a-time socks into 2-at-a-time-sleeves....


But my progress is constantly interrupted by these little fluffy things.....


And the fact that my car failed her MOT, poor darling, she needs a little tweeting.... I mean tweaking!

**If you would like to learn more about our chick raising you can check out our house blog here