Showing posts with label tutorial. Show all posts

Tuesday, 6 October 2009

Scrappy little bird mobile


This is the easiest little project to do even if you are a beginner in sewing. It can be accomplished quickly and will use any colour or pattern of scraps which you fancy.

You'll need:

-Piece of paper
-Fabric scraps in colour or pattern you prefer
-Stuffing (can be synthetic stuffing or you could use more little fabric scraps if you dont have synthetic stuffing)
-Embroidery Floss
-Buttons or beads
-Yarn (just a strand about an arms length)

First of all you'll need to pick your fabric pieces. I made this mobile with 4 different solid colours of linen scraps, but you can make as few or as many birds in as many colours as you like and from whatever fabric you have left over.


Now take a piece of paper and fold it in half. Then take your smallest piece of fabric and mark the width on the folded edge of paper like this...


remember to leave fabric for seams at the edges. Now from the marks you made draw a shape like this...

proportionally, the shape is probably twice as long as it is wide. cut it out making sure you dont cut the fold and you should have a shape like this...


Cut the pieces of your fabric out by pinning the shape to them and allowing for seams, it should look like this...


now fold the fabric shapes in the same way the paper shape was folded, with the right sides of the fabric facing each other , and stitch from the folded edge down both sides of the shape leaving the bottom open, giving you this...


Now turn the shape the right way round, using a pencil to poke the points out, like this


Do the rest of your fabric shapes and you should have a pile of little bird bodies


Now get your stuffing and fill the little birds


When each one is filled turn the lips of the hole in and bring them together


Pin and stitch down the seam as close to the edge as you can


When they are finished you should have a little pile of cushions like these...


Now it's time to get creative, take the embroidery floss and use it to make these little pillows into little birds, pick one end to be a beak, push both sides of the pillow together flat and stitch a triangle for the beak, pick a point to stitch on your eyes and the same for the wings. Now, if you are better at embroidery than I am, which, lets face it, wouldn't be hard, then this is the moment to shine, use your fabulous skill to make extraordinary little birds (my husband had a hard time believing mine were birds at all!!) Anyway, these are the basic little birdies I turned out...


Now do the rest of your birds...


Now take your length of yarn and start connecting your birds.


If you have beads, use the beads threaded between the birds to separate them. I didn't have beads, I used buttons just to decorate it a little...


Once they are all threaded on snugly you're finished.

You have a lovely little string of birds and you used up some of your fabric scraps.

Thursday, 11 December 2008

Wednesday Winner

Wow.... I was overwhelmed to see so many people visit my blog. I hope that you all had a little look, I have checked out so many new blogs over the last week and really had a lot of fun.

I randomly selected a winner from the 230 comments.... it's Beth...

Blogger Beth said...

Beautiful fabric choice, I have a SIL who knits every where she goes, and this would be great for her needles.

04 December 2008 13:45


I'm sorry I can only give it away to one person (there's only one roll) however, because of the response, I thought I would put a tutorial up over the next week or so, and then you have some help to give it a go yourself, so keep an eye out for it ! .....I had better go and email Beth.

Hopefully I'll see more of some of you.

Friday, 29 February 2008

Russian cast off : : A knitting tutorial

The Russian cast off (Russian bind off) is a looser, stretchier and more elegant way of casting off than the traditional method. It works particularly well as a finishing to ribbing, especially on a ribbed collar or a ribbed band (eg on a hat).

To start with, take your row of stitches (practice on a swatch first I think)


Knit the first one as you normally would when casting off


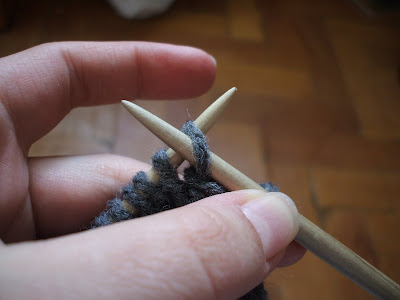
Now, insert the left needle in the back of the stitch you just knitted, you should have this sort of thing...


Now, take the tip of the right needle and insert it in the next stitch, as if to knit,


you should see a lovely cross formed with the stitches and the needle through both of them and out the back, like this


Now, just pass the yarn round the needle as usual for a knit stitch


Pull the point of the needle back through your cross, you should have a lovely stitch on your needle


Now pull that off the left needle, and start again


Put the left needle through the back of the stitch on the right


Right needle through next stitch to knit


Knit


Off


Keep going, it should look like this


and eventually, you have this


Here are a couple of examples of this stitch in real live action.....

The collar of the Drops Jacket


The band of the Astrum Beret


Simple, elegant and useful, give it a go.

Sunday, 3 February 2008

Heat bag tutorial

I have a lot of back problems and I find one of those microwavable heat bags is just the thing I need at times to help soothe it a little... however, I have 2 major problems with my bog standard shop-bought heat bag

1. All the wheat falls to one end when I use it
2. I can't find it...

Which spawns this...


My own (sheepish) lavender scented heat bag with individual compartments for the rice, so that it stays evenly distributed. I used rice as it's what I had in the cupboard.

**When heating the heat bag, put in the microwave for a max of 2 mins, it should heat up quickly and any longer may burn you**

You will need:
  • 20" x 10" piece of natural fiber outer fabric (I used a heavy cotton/linen canvas)
  • 20" x 10" piece of cotton lining fabric
  • sewing machine (hand sew if you are brave enough)
  • aprox. 200g of rice (long grain and not quick cook/ parboiled rice)
  • 9 teaspoons of dried lavender flowers
  • Ruler, Pencil, teaspoon, funnel, iron

Start out by cutting your fabric up into pieces 20" x 5"so you should have 2 pieces out outer fabric and 2 pieces of lining fabric with those measurements.


Put the outer fabric to the side for now, take the lining and consider the edges like this

(to see larger versions of the pics at any time just click on them)


Now make a 1cm pressed fold along egde A of both pieces


and now you can consider the right side (RS) and wrong sides (WS) of the fabric like this ...


Place the 2 Right sides of the fabric together so that the folds are on the outside like this


Now, sew round edges B , C & D, leaving the length of edge A open


you should have a pocket like this


Turn the pocket the right way round, so that the folds are now on the inside, press flat and even.


Now take a ruled and (here I should say fabric marker, but I dont have one) pencil, measure out and line 2.1" compartments all the way along the pocket. In the end you should 9 marked out pockets like this


Now sew up each of the marked lines and you should have 9 little pockets like this


Heres where you will need your rice, lavender and your teaspoon. In each of the little pockets put aprox 4 tsp of rice and 1 tsp of lavender. the pockets shouldnt be more than 2/3 full in the end.


Now, sew the little pocket shut, like this


Repeat these steps until you have 9 filled and sealed little pockets along the strip


Now come back to your outer fabric. Place RS together.


Considering the edges the same, fold down (towards the wrong side) and press 1cm along each edge B.


And now sew edges C, D & A so it should be a long narrow pocket looking like this


Now turn the right way round and press


Now insert your pockets in the outer fabric


And neatly sew edge B closed


There you have it, you just made a heat bag and I bet it didnt take you long.